This month I’ve been asked by Tomash to write about my favorite X100T settings for portraiture. I’m actually glad he did so, because after what now are ten months of using the X100T as my main camera for portraits and fashion I can say I found the “perfect” configuration, one that not only makes the most of the camera for such genres, but that’s easily and quickly adaptable for a quick snapshot, whenever it is required.
To show you that this configuration works equally well for portraying people other than fashion models, I’ll use, for this time, portraits I’ve taken of my daughter during these months with the X100T. If you know kids and how hard they can be to portray, then you’ll know that kids portraits are the real challenge from which a camera and its configuration can be evaluated!

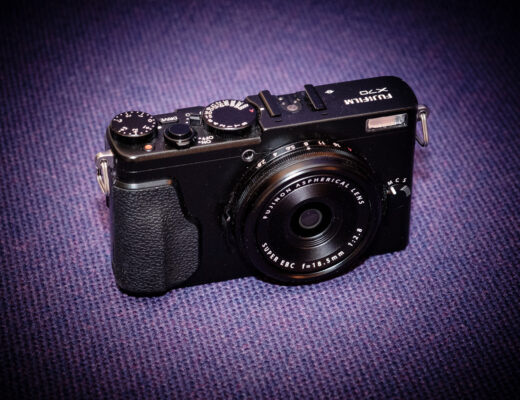
ISO6400, f/2, 1/70
The X100T provides a lot of personalisation when it comes to controls. One of the main upgrades of the X100T over the previous X100S is the existence of seven configurable buttons. Considering that the most important functions (MF/AF selector, focus zoom, drive selector, and AEL/AFL) already have dedicated buttons, the X100T’s level of configurability is almost perfect. Furthermore, the personalised and quick access menu, accessible with the Q button, gives even an extra level of configurability to this camera. So, how did I configured it for my portrait photography, and why?
To make the information in this post quick and easy to apply to your cameras, I decided to follow the very same order of items in the camera menu. For each item I will describe how I set it and why. It’s not the best way to explain how I work, I know, but I feel that once you’ll get to the end you’ll have, besides an X100T perfectly configured, a precise idea of how I approach my shootings. A piece here, a piece there, there’s a lot of a photographer in how he prepares for a shooting.
As an extra bonus for those of you who’ll get through this post, at the end you’ll find all the X100T’s “secret functions” I could find. Some of you may not know it, but Fujifilm assigned special functions to some of the camera’s buttons, which are activated by keeping them pressed for a long time or by pressing them during “play-mode” (that is, after pressing the play button to review the last photographs). Most of them are incredibly useful, and make this camera even quicker to operate and tune.

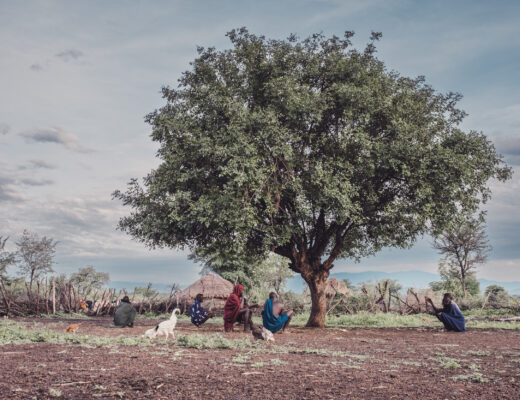
ISO400, f/2, 1/900 sec
SHOOTING MODE
OK, after all this intro I’m starting with an item which is not even in the menu. But the thing is, it is not because the X100T doesn’t have a software to select how you are shooting, if automatic, shutter speed priority, aperture priority, or manual. In this respect, the camera is designed to work like old mechanical SLRs and rangefinders, so it’s set on automatic if the both the aperture ring and the shutter speed ring are positioned on the red A, on aperture priority if the aperture is set on an f-stop and the shutter speed is kept on A, on shutter speed priority by reversing this combination, and, finally, on manual mode if you select both an f-stop number on the aperture ring and a shutter speed on its ring.
Personally, I’m used to work on aperture priority, and I use it every time I’m not capturing movement (then setting the shutter speed is crucial) or working with solely external flash lights (then I set the shutter speed on 1/125th). In every other situation I use the aperture ring to set the depth of field I want and leave the camera figure out the rest. The beauty of mirrorless cameras is that I can operate the exposure compensation dial to get just the perfect light to come through. The camera figures if it’s the case to change the shutter speed or the ISO. As far as they are within the limits I set, I’m fine. Easy peasy.
AUTOFOCUS SETTING
Let me start saying that for portraits I prefer to work with manual focusing. This is because I often find myself shooting “through” things, like foliage, glasses, smoke, all things that easily trick any autofocus system. The live-view image magnification makes manual focusing easy and precise, so I never miss a shot when in tricky conditions. On the other hand, setting the AEL/AF button for focusing makes it possible to retain autofocus even when the camera is set on manual focus. It’s easy, just press the AEL/AF button. Most of the times I start with pressing this button and then I use the focus ring to do the micro adjustment. Razor sharp eyes are not a problem anymore!
1) FOCUS AREA: I usually keep the largest for fastest AF. For extra precision I usually go with manual corrections. However, changing size on the spot is easy, you just need to turn the back dial while selecting the focusing point.
2) MACRO: keep it off if you want to retain the ability to use the OVF. Macro on automatically forces the EVF.
3) RELEASE/FOCUS PRIORITY: focus (when I use AF it is because I want it to focus!).
4) INSTANT AF SETTING: af-s (it uses less battery and allows for re-composing the frame after focusing).
5) AF MODE: mf.
6) FACE DETECTION: on (it stays off when I’m on MF, but automatically switches on when I set the focusing switch to S, this way providing an extra help in quick focusing a sucject).
7) PRE-AF: off (to increase battery life).
8) AF ILLUMINATOR: off (in my experience AF illuminators are rarely useful, but always bothering!).
9) CORRECTED AF FRAME: on (I like to see what I’m focusing on when using the OVF).

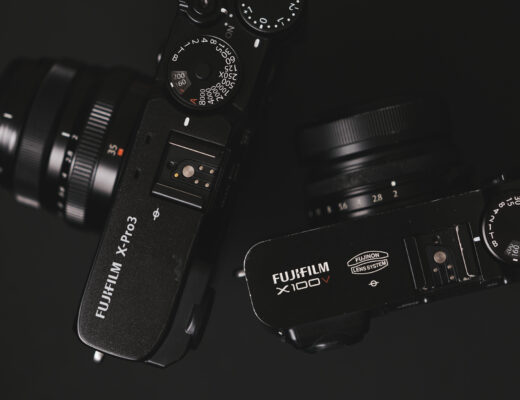
ISO200, f/2, 1/90 sec
ISO
I find that the camera provides good results until ISO6400. The X100T won’t provide RAW files beyond this, nor under ISO200.
1) AUTO1: 200-6400 1/100 (this is my preferred approach for everyday use, it keeps the ISO as low as possible while still providing a shutter speed good for landscape, street and posed portraits).
2) AUTO2: 400-6400 1/125 (this is my preferred approach for street photography, if its sunny the minimum 400 ISO will force the camera to use fast shutter speeds, which is good for stopping movement, but if it’s darker than that it will keep forcing a fast shutter speed until 6400ISO, after which the shutter speed will start lowering).
3) AUTO3: 2000-3200 1/125 (this is my current approach for flash photography, it forces the ISO to stay high enough to capture ambient illumination while having a shutter speed quick enough to capture actions like dancing).
IMAGE SIZE: L3:2
IMAGE QUALITY: RAW (it’s true, X100T delivers excellent jpegs, but I end up preferring the raws over the jpeg versions every time, so I stopped saving jpegs long time ago).
DYNAMIC RANGE: DR100 (I like to assess the actual contrasts, I know that if I need any “opening” I can get that in post-production).
FILM SIMULATION: CC (I just LOVE LOVE LOVE Classic Chrome).
FILM SIMULATION BKT: never used, I don’t think I’ll ever use it.
ND FILTER: off
COLOR: 0
SHARPNESS: 0
HIGHLIGHT TONE: 0
SHADOW TONE: 0
NOISE REDUCTION: 0
LONG EXPOSURE NR: OFF (I don’t usually apply noise reduction because I love the X100T’s grain quality. But when I have to, I prefer to apply it in post production).
WHITE BALANCE: AUTO (the auto wb works pretty well, when it doesn’t I either change it on the fly or correct it in post production).
EDIT/SAVE CUSTOM SETTING: I’m not using this feature yet. It seems to me that the set of features and settings that fall under the “custom setting” is way too limited to be really useful. Maybe in the future I’ll change my mind.
FUNCTION SETTING
This is a crucial step in the camera setting, the one that influences the shooting experience the most. I’m used to change the focus point a lot, so I decided to “sacrifice” the four directional button to this purpose to get the fastest access to focus-point changes. The focusing point is crucial both in AF (where it allows to frame the “subject” so you won’t need to reframe every time to press the AF button) and in MF (where it allows to enlarge the portion of the frame where the subject is, so once you get the focus right you can press the shutter and take the photo right away, without re-framing).
1) Fn1: DOF preview (extremely useful in portraiture to check how much of the foreground/background you want in focus).
2) Fn2: AF
3) Fn3: AF
4) Fn4: AF
5) Fn5: AF
6) Fn6: movie (without setting at least one button for movie recording it is impossible to start a video. I shoot videos very, very rarely, but when it comes the time I don’t want to mess with the menu and have to remember how to switch it on).
7) Fn7: macro (If I am shooting a detail and find myself I need that extra macro vicinity I can switch it on with my left hand, being the last button it is easy to find it, without having to leave the eye from the viewfinder nor changing my grip or stance).
Whit this setting, if you need to quickly change the function of Fn1, Fn6, or Fn7, you just need to keep them pressed long enough to open the “button setting” menu.

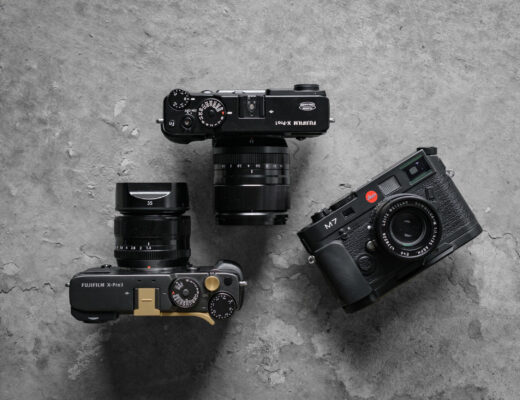
ISO6400, f/2.8, 1/18 sec
DISP CUSTOM SETTING
OVF: framing, level, af distance, mf distance, aperture/s-speed/iso, exp. compensation, photometry, flash, white balance, film simulation, frames remaining, battery level
EVF/LCD: framing, level, af distance, mf distance, aperture/s-speed/iso, exp. compensation, photometry, flash, white balance, film simulation, frames remaining, movie mode and rec time, battery level.
CONVERSION LENS: OFF
MF ASSIST: PEAK WHITE (HIGH) (I prefer focus peaking, I’m usually quicker in manual focusing this way, and the white set on high gives me clear and strong information).
ADVANCED FILTER: OFF
AE/AF-LOCK MODE: ON/OFF SWITCH (so I don’t have to keep it pressed to focus).
AE/AF-LOCK BUTTON: AF LOCK ONLY (I work in MF with the ability to toggle AF anytime I want without switching to AF and then pressing the shutter, I just have to press once the AFL button).
PHOTOMETRY: MULTI (it is usually correct, but I use the exposure compensation dial to fine tune the correct exposition).
INTERLOCK SPOT AE & FOCUS AREA: ON
RED EYE REMOVAL: OFF
SAVE ORG IMAGE: OFF
FLASH MODE: EXTERNAL FLASH (this way the camera can operate with external flash triggers, such as the YN-622C-TX)
FLASH COMPENSATION: +2 (whenever I use the flash I correct with an underexposure of -2. This helps “vignetting” the subject, and effect I usually like when using small, frontal flashes like the X100T’s).
SHUTTER TYPE: MS+ES (this way the camera uses the better MS till 1/4000th of a second and switches to the ES if it need to go higher. Plus, the flash doesn’t work with the ES, so this setting switches automatically to MS when using the flash).

ISO200, f/4, 1/1250
MOVIE SET-UP: unrelated with this post.
WIRELESS COMMUNICATION: it start camera’s wi-fi communications.
DATE/TIME: unrelated.
TIME DIFFERENCE: unrelated.
LANG: unrelated.
RESET: unrelated.
SILENT MODE: OFF (I have manually switched off the sounds and the AF illuminator, so this feature is redundant, plus setting it on ON would deactivate the flash).
FOCUS RING: clockwise, it’s just the way I like it.
FOCUS CHECK: OFF (if I need to zoom-in the focus area I just press the rear dial).
SOUND SET-UP: everything OFF (I want the camera to be as silent as possible).
SCREEN SET-UP
1) IMAGE DISP.: OFF (when I want to see a shot I can press play, but I don’t want anything getting in the way of a possible shot).
2) EVF AUTOROTATE DISPLAYS: ON
3) PREVIEW EXP. IN MANUAL MODE: ON (to be switched off when working with external flashes, like studio flashes).
4) MONITOR SUNLIGHT MODE: OFF
5) EVF BRIGHTNESS: 0
6) EVF COLOR: 0
7) LCD BRIGHTNESS: 0
8) LCD COLOR: 0
9) PREVIEW PIC. EFFECT: ON (when using the EVF I want to see the film simulation I’m using).
10) FRAMING GUIDELINE: GRID NINE
11) AUTOROTATE PB: OFF (I like to have photos filling the screen).
12) FOCUS SCALE UNITS: METERS

ISO200, f/4, 1/600 sec
SELECTOR BUTTON SETTING: FOCUS AREA (when I need to change the focus point I want to do it as quickly as possible, so I left all the four d-pad buttons dedicated to the task).
EDIT/SAVE QUICK MENU: This is another crucial step in camera usability. The items in the quick menu are not as quick to access that the ones assigned to the Fn buttons, but are close. You won’t need to navigate the full menu to access these items, plus you’ll be able to assess their state just by glancing at the quick menu screen, activated by pressing the Q button on the camera’s back. Henceforth, their carefull selection and positioning can be really important. This is my list, starting from top left, ending bottom right:
1-1) MF ASSIST (for quick changes, for example, of the focus peaking color).
1-2) AF MODE (this works only if the AF switch is set on S or C).
1-3) FACE DETECTION (to quickly turn it on or off).
1-4) PHOTOMETRY (to quickly switch, for example, to point exposure program).
2-1) CONVERSION LENS (crucial if you have a converter lens, futile otherwise. I would suggest you to get the teleconverter, however, because its fantastic).
2-2) SELF-TIMER (so when you need it you know where to find it).
2-3) FILM SIMULATION (should you want to try a different look).
2-4) ND FILTER (when you need it, you need it badly, so it’s better to have it here).
3-1) FLASH MODE (to switch from EXTRNAL FLASH to INTERNAL FLASH easily when you need to).
3-2) FLASH COMPENSATION (together with the exposure dial, the flash compensation can tune the photo lights).
3-3) ISO (to change which AUTO program you’re using, or to set a fixed ISO when on full manual mode).
3-4) WHITE BALANCE (quick access for live-view tuning).
4-1) EVF/LCD BRIGHTNESS
4-2) DYNAMIC RANGE
4-3) SHUTTER TYPE
4-4) SELECT CUSTOM SETTING
POWER MANAGEMENT
1) AUTO POWER OFF: 2 MIN (the shortest, for longest battery life).
2) OVF POWER SAVE MODE: ON
3) HIGH PERFORMANCE: ON
SHUTTER COUNT: unrelated.
EDIT FILE NAME: unrelated.
WIRELESS SETTINGS: unrelated.
PC AUTO SAVE SETTING: unrelated.
GEOTAGGING SET-UP: unrelated.
INSTAX PRINTER CONNECTION SETTING: unrelated.
COLOR SPACE: Adobe RGB (for the best compatibility with high end prints).
FORMAT: unrelated.

ISO6400, f/2, 1/50
For those of you who didn’t know, some of the X100T’s buttons have special functions activated by keeping pressed the button or by pressing it while in play-mode. Here they are:
1) View Mode: keep it pressed for a couple of seconds and you’ll switch MONITOR SUNLIGHT MODE to ON.
2) Wi-Fi (Fn6): if you press this after pressing play (so you need to be in play-mode, that is, reviewing the last photos) this button will switch on the wifi, independently to what you set the Fn6 button for. Since I set Fn6 for MACRO, I use this trick every time I want to start the wifi connection, without having to navigate the menu.
3) Q button: keep it pressed for a couple of seconds and the EDIT/SAVE QUICK MENU will show up. If pressed while on play-mode it will open the raw-conversion interface.
4) MENU/OK: keep it pressed for five seconds and it will lock lock the Q button (to prevent unintended changes of the camera settings).
5) Fn1-6: keep any of the Fn buttons pressed for a couple of seconds and you’ll be albe to change its functioning (it doesn’t work on the d-pad if you chose SELECTOR BUTTON SETTING: FOCUS AREA).
7) Rear dial: press it to zoom in while focusing, rotate it to change the zoom level, keep it pressed to change the MF assist options. While on play-mode, press it to zoom in the photo, rotate it to change the zoom level.
8) Focus ring: while on play-mode this will work as a dial to scroll through images. This is particularly useful when using the rear dial to zoom into pictures, with the focus ring you can scroll through zoomed in pictures to check, for example, which of a series of photograph has the sharpest focus.

ISO400, f/3.6, 1/125