As a photographer, experimentation is an important component that helps me to constantly refine my vision. It’s probably the most important factor in any art form. Therefore, why not use the most creative and powerful tools on the market to make the experimental and creative process more easy? For people who don’t already know my work, almost ten years ago I started using Alien Skin Exposure on my regular workflow for portraits and a bit later for landscapes as well, and this beautiful piece of software has never disappointed me.
During my career in photography I have worked in several different contexts, and in the last three years my landscape photography business has grown a lot such that I’m investing the majority of my time on it. Any landscape photographer knows how important the RAW processing stage is, it’s really important to take full advantage of the high dynamic range of the sensor to pulling out all the fine details in the shadows and highlights. So, it’s crucial to adopt a good RAW developer.
In the new Exposure X4, these adjustments in the Basic Panel have improved considerably compared with the previous version. Each of these sliders works flawlessly and now the amount of details that can be recovered is huge. It’s absolutely an impressive jump forward!
Before I discuss in more detail the main new features of Exposure X4, I’ll mention the speed enhancements. I have found that my photo processing is faster and the faster file export times speed up my workflow considerably.
There are other global improvements in Exposure X4 in terms of effects, as well as tethering.
Let’s take a look at some of the new features in Exposure X4.
RAW Processor Improvements
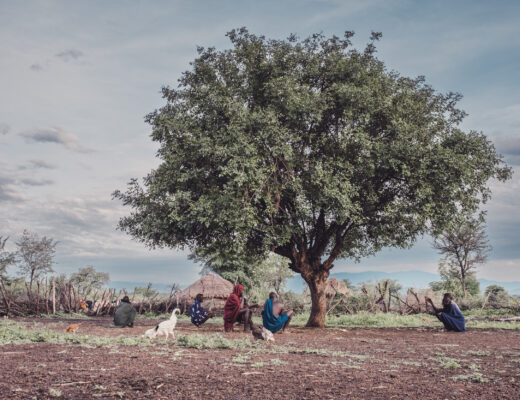
First of all, I want to show you how you can manage “difficult” exposures with the improved shadow and highlight recovery in Exposure X4. Below is an underexposed image captured a couple of years ago in the Dolomites; actually that’s from a bracketing series of three shots, in this case the darkest one (-2 stops) to hold the details on the clouds. The foreground vice versa is pretty dark.

As I said, the image above is the unedited RAF file, and as you can see lights and shadows are completely unbalanced. Here is my first edit, which has some basic adjustments in the exposure, highlights, and shadows, just to see the powerful engine of this new Exposure X4. I’ve recovered tons of details and the file is really clean from any artifacts. At this point, I have an image with more details to work with but a lack of contrast because the dramatic recovery of the highlights and shadows introduced a huge decrease of the global contrast.

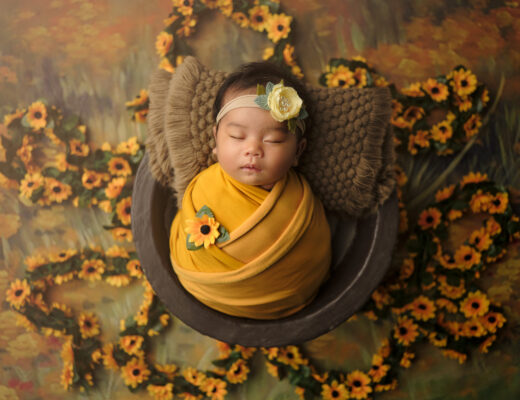
The third image is a simple edit using layers in Exposure X4 to balance the lights and shadows in the different areas. Then I applied one of my favorite presets, Kodachrome 35mm – Faded (cyan) to achieve a final pastel vintage look.

Here’s a screenshot showing my edits in Exposure:

Here’s another example of Exposure’s new recovery ability. In this one, I worked on an image with a good exposure of the land but with an overexposed sky. The first image is the RAF file unedited:

In the Basic panel, I reduced the Exposure slider slightly to increase the density of the image and also reduced the Highlights slider all the way to the left for maximum highlights recovery. The basic editing is pretty much complete, and now I have a good starting point to work with towards the final product.

Transform Tools
Using a wide-angle lens can cause the perspective of photographs to be tilted or skewed. These types of distortion are particularly evident in photographs that contain vertical lines or geometric shapes. In the new Transform panel in Exposure X4, you have the right tools to easily correct those photos that have a distorted vertical or horizontal perspective.
The Transform panel provides seven options to tune the perspective correction ─ Vertical, Horizontal, Rotate, Aspect, Scale, X Offset and Y Offset. You can refine the adjustment by manually modifying the slider-based transform options.
There is also a useful flag to activate the Gridlines to have more precise adjustments.
Here’s my original RAF with no edit. You can see the very obvious distortion – the vertical perspective is completely off and the global perspective is quite unnatural.
![]()
With the following tweaks in the Transform panel, I achieved a gorgeous result and a well balanced image:
![]()
You have also a helpful option to activate the Gridlines to obtain more accurate adjustments along the correction process:
![]()
Here’s the final image with perspective correction and all the edits (basic panel, colors, presets):
![]()
Smart Collections
Organizing and finding images in Exposure X4 is easy when using Exposure’s collections. To make collections even more powerful, Alien Skin added smart collections, which automatically gather all images based on any number of keywords or other metadata you assign.
Setting up a smart collection is as simple as entering a keyword, either when using Exposure to first copy the image from your card to your computer, or in Exposure’s Metadata panel. Then you create a smart collection just like you would a regular collection, but with the extra benefit of selecting what metadata causes Exposure to place your images into the collection automatically. You can add keywords, as well as rating info and even camera info (ISO, shutter speed, etc.). As a result, selecting images for future portfolio sharing, slideshows or other stuff is as easy as clicking on a collection. Imagine having all of your favorite photos automatically saved to different collections based on a simple keyword or a star rating. It makes organizing much, much easier.
Creating Smart Collections
From the Collections panel, click the small “stack folder” icon and select New Smart Collection. Name the collection set and choose the parameters for the automatic selection.
Here below is an example of how I set up one of my smart collections. In this case, I need to sort my images based on the focal length I used. I choose this because during my photography courses, it’s extremely helpful to show to students how different focal lengths work. Also, when I receive any request from photo magazines about a specific type of shot, it’s helpful to sort my images this way.
Imagine combining smart collections with Exposure’s ability to build a gallery for your clients. You can add a keyword such as the client’s name.
I can add as many or as few criteria to produce the results I want. Here, I start by selecting Focal Length criteria, in this case in the range from 70mm to 300mm. After that, I choose the next three rules: Flag, Rating and Color criteria based on my personal choice (usually I use the Red label to identify a master shot). I then click Save to create the new smart collection.

Once you start to use this organizing method you will save a huge amount of time by being able to quickly find the images you need. Your photo archive will be perfectly optimized for a smoother workflow.
Here’s a screenshot showing a series of criteria I used to filter the images that belong to the Tele-shots group. In my workflow, I usually use flags, stars, and labels in this way:
Flags: white flag → selected shots noteworthy
Stars: 5 stars → hero shot
Labels: Red label → hero shot edited in Exposure and it’s ready to share or for print, Blue label → if the “red labeled shot” needed some more advanced corrections in Photoshop.

Automatically Add or Remove Images
Adding or removing images to a smart collection Set is easy. Adding a specific Keyword to an image will automatically add the image to your specific collection. You can also add other keywords to the same image. The choices can get very creative. Removing one keyword from an image will also remove it from the smart collection.
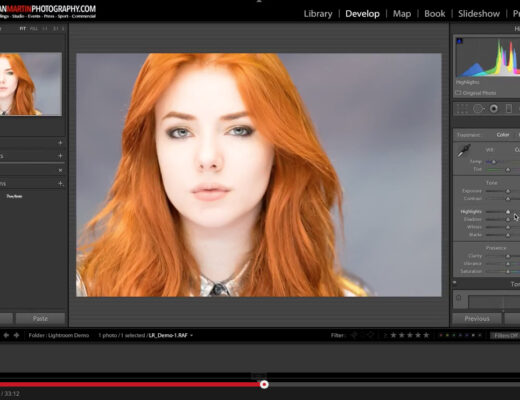
Monitored Folders & Tethering
First of all, what is tethering photography? Tethered shooting is where you link your camera up to your computer via a cable, so you get a larger preview of what your camera is seeing and the ability to adjust your camera settings from your computer.
In addition to my landscape photography workshops and courses, another big part of my business is shooting studio portraits for private customers and companies. Tethering helps me get the perfect photo in fewer shots. Viewing images on a larger screen is a great way for me and my clients to spot issues with focus, lighting, posing, or composition. I’ll spend less time editing and my clients can let me know the moment I’ve captured the shot they are looking for.

Fujifilm cameras like X-T2 don’t have the same tethering functions as other brands. Yes, they can shoot tethered but in a roundabout way. You need the free Fujifilm’s software X Acquire to connect your camera with Exposure X4. Once you install X Acquire, you set the destination folder where all the images captured will be stored, as well as the file format (RAF or JPG). At this point, you will find in the left Folders panel in Exposure the new tethering-folder you just created in X Acquire.
Here’s the screenshot with new monitored folder Alien Skin Tethering:

Once the tethering folder is associated in Exposure X4, in the next window you can set up all the metadata. You can also choose the name format of the files that will be stored on the hard disk, as well as have a quick preview of the shots with one or more preset applied. This enables you to view a comparison of different presets, to help your client decide what he or she prefers. Exposure creates these different variants of the image as virtual copies, which is a nice touch because it doesn’t fill up your hard drive.

Here is the grid display of the images that appear in Exposure immediately after I take them:

The tethering process in Exposure X4 is absolutely brilliant, very fast, reliable, and the connection with my Fujifilm camera is always really strong. If you work in a studio environment or on location as well, tethering is a feature that will save you a lot of time. No more blurry photos, you’ll shoot less, and you’ll be able to nail down your composition much more easily.
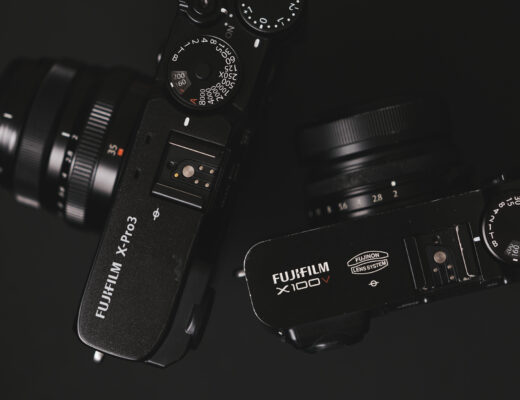
Adjustable Light Effects
The last update in Exposure X4 that I’ll discuss is the Overlays panel, which features new fully adjustable light effects. To be totally honest, I don’t use this panel so frequently because of the style of my photos, but nonetheless, these light effects are absolutely gorgeous, and this can be the right time to include some of them in my future images.
I applied one of them to an experimental environmental portrait that I shot a couple of years ago. I love moody quality and dark tones, and I like the interaction between lights and shadows. I tried to achieve a dramatic feel using a bunch of layers to adjust contrast, vignette, verticals and colours. To emphasize the subject, I applied the light effect Haze Pale, which is in the Sun Flare category.
Here is the original shot straight out of the camera:

I placed the light effect on the top of the frame with an opacity of 45% and a slight rotation of the direction of the sun’s rays. This small adjustment makes a big difference for the final result by adding a really dramatic light gesture on the trees and the forest.
Here’s a screenshot of my light effect settings:

I also deemphasized the foreground, to make the image much moodier. Here’s the final edit:

Conclusion
What can I say? Exposure X4 is a very solid platform to build your entire photographic archive. The new features and latest updates are another full step forward for the professional photographers and amateurs as well. As a landscape photographer, I particularly enjoy the Basic panel improvements, especially the highlight and shadows sliders. The Alien Skin Team did a really fantastic job here! If you haven’t tried Exposure yet, you can download a free fully-featured 30-day trial.
Thanks to the amazing Alien Skin team and to the great community at Fujilove!